
An apartment, or flat is a self-contained housing unit type of residential that occupies only part of a building.

Above all, preparation is crucial to a natural staining project. Before doing anything, our crew will prepare a home for the rest of the staining process.
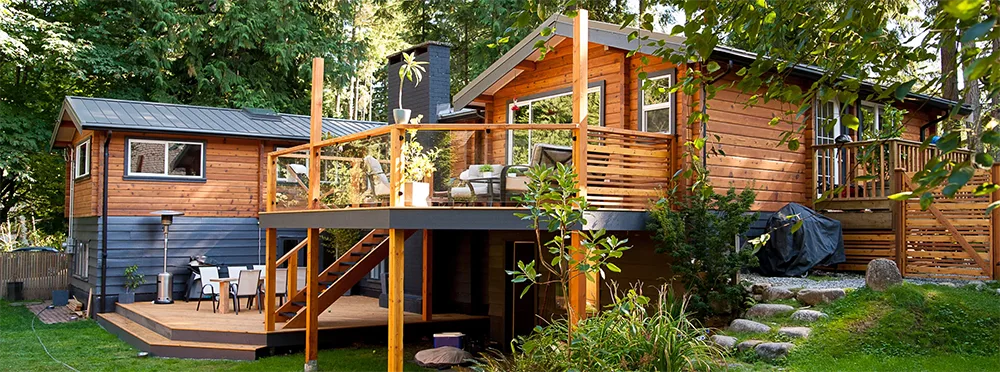
This house is located in a very damp and humid area of the lower mainland. It is very important to understand the weather conditions around every project site. As a result, ensures that the material will adhere properly to the surface.
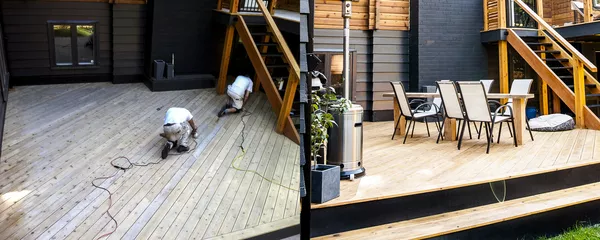
First, the preparation for any coating project starts by disinfecting the surfaces. By disinfecting we are referring to cleaning any dirt, mildew, or algae that has been trapped between the edges or on the flat surfaces.
Secondly, a surface must be smooth before staining. This step is important because if the sanding is not done correctly, the topcoat of the natural stain will not penetrate properly, resulting in a thicker coating on the surface.
Additionally, sanding must be done with consistent pressure to make sure the surface is sanded evenly without any burn marks from the belt machine. Contact our Burnaby Vancouver painting company to learn more.
After we thoroughly cleaned the surfaces, we spent the next five days sanding all of the wood. We sanded the surfaces with 100 grid sandpaper and finished with smooth 140 grid sandpaper.
Our three years of industry-leading warranty is included with every project we perform. Additionally, the manufacture of the material also incudes their warranty.
Our projects are completed with our experienced in-house employees and we bring 30+ years of experience to every project performed by AZ Painting.
We are a licensed, insured, and bonded painting company delivering quality workmanship. Our A+ Rating with Better Business Bureau shows our integrity.
Log houses exude a rustic charm that captivates homeowners and visitors alike. The key to preserving and enhancing this charm lies in the careful application of a natural wood stain. In this blog post, we’ll explore the essential preparation work involved in sanding the wood and applying a proper natural stain coating to ensure that your log house retains its beauty and durability for years to come.
Before delving into the preparation process, it’s important to understand why natural wood stains are the preferred choice for log houses. Natural stains are derived from plant-based materials, which aligns perfectly with the eco-conscious mindset of many homeowners. They provide a subtle and timeless finish that allows the wood’s natural grain and texture to shine through, adding warmth and character to your log house.
Properly preparing the wood surface is crucial to achieving an even and long-lasting natural stain finish. Sanding serves as the foundation for the entire staining process, and it’s important to get it right.
A+ rating on Better Business Bureau
Here are the key steps involved:
Before you start sanding, make sure you have the necessary equipment, including sandpaper of various grits (ranging from coarse to fine), a power sander (optional but recommended for larger areas), a dust mask, safety goggles, and work gloves. The choice of sandpaper grit depends on the condition of your log house. Coarser grits are suitable for removing old finishes or significant imperfections, while finer grits are ideal for smoothing the wood’s surface.
Begin by inspecting the logs. Remove any loose dirt, debris, or old finish using a broom or a stiff brush. Look out for signs of mold, mildew, or rot, as these issues need to be addressed before sanding. If you find any of these problems, it’s important to resolve them to ensure the stain adheres properly and to prevent further damage to your log house.
Once you’ve completed the sanding process, remove all sanding dust from the logs. This can be done using a vacuum cleaner or a tack cloth. The removal of dust is crucial, as it ensures that the stain adheres uniformly and prevents any blemishes or irregularities in the finish.
Select a high-quality, plant-based natural wood stain that complements the color and character of your log house. Natural stains are available in a variety of hues, from light oaks to rich mahogany. Ensure that the stain you choose is designed for exterior use and offers UV protection, which helps protect the wood from the sun’s harmful effects.
Before you start applying the stain to your entire log house, be sure to stir the stain thoroughly. This ensures that the pigments are evenly distributed. Additionally, it’s a good idea to test the stain on a small, inconspicuous area of one log to confirm that you’re satisfied with the color and the way it interacts with the wood’s grain.
a. Start from the top and work your way down, applying the stain with a natural bristle brush or a staining pad. Following the log’s natural grain, work in small sections to ensure an even coat.
b. For large log houses, consider using a sprayer or roller for efficiency. However, be cautious to avoid drips or uneven application.
c. After applying the stain, use a clean cloth to wipe off any excess, ensuring that the stain penetrates the wood and any buildup is removed.
Allow the first coat to dry completely, usually within 24 to 48 hours. Check the manufacturer’s recommendations for specific drying times. Depending on the desired depth of color, you may apply additional coats, following the same process. It’s essential to let each coat dry thoroughly before applying the next.
To protect and preserve your log house, finish the process by applying a clear, plant-based wood sealer or a topcoat. This provides an additional layer of protection against the elements and UV damage while enhancing the wood’s natural beauty.
In conclusion, the preparation work involved in sanding the wood and applying a proper natural stain coating is crucial for maintaining and enhancing the beauty of your log house. By choosing a natural stain and following the sanding and staining steps meticulously, you can enjoy a stunning, eco-friendly finish that highlights the natural elegance of your log home while protecting it from the elements for years to come.
An apartment, or flat is a self-contained housing unit type of residential that occupies only part of a building.
exterior residential painting in burnaby